Monday, 20 February 2012

How to make a Teotihuacan Inspired Mask

Here is one of the projects I presented at my conference sessions.  It's a papier mache mask based on an ancient Teotihuacan mask. 

I find it artistically interesting because of the use of a mosaic on the mask, that's not something you see everyday.


Here is a picture of the original.  This project was part of my "From Primitive to Post Modern" session.  One of the advantages to this project is that because it is based on an ancient mask that is showing some decay or wear, the mosaic does not have to be fully finished.


 Museo Preistorico ed Etnografico
Pigorini, Roma
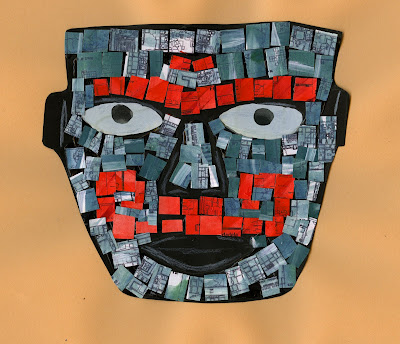

There is also a paper version I'll show you how to do at the end in case your are not up for papier mache.


Before I start with the "how to" I have another featured Design post on the Hive right now that you might want to check out.  the product I'm testing is Aleene's Paper Napkin Applique Glue and I show how to make this Star Wars book bag.


MATERIALS REQUIRED: Papier Mache Version

- a cardboard box
- mask stencil that you will make
- paper towels
- newspaper
- tape
- white school glue
- water and a recycled container
- black paint, tempera or acrylic
- red and green tempera paint
- copies of archaeological maps, #1, #2
- white paper, posterboard, or bristol
- string
- red beads

PROCEDURE:

Take a piece of paper (8.5 X 11) and fold in half.

Draw out 1/2 of the mask shape including an eye and mouth.  Use the fold as the middle of the mask.

Cut out your stencil.


Take your cardboard box and tape your stencil on the side utilizing the corner to run down that middle line of your mask.

Trace out the shape and then cut from the box.


By using the corner you build in the angular shape to the mask.

Roll up a piece of newspaper and tape into place for the nose.


Using a 1 to 1 ratio mix up the white glue and water into your recycled container.  Cut some strips from the paper towels and begin maching the mask.

Try to overlap the strips in a criss cross manner.  You only need about 1 to 2 coats here.

Now you may find you cardboard starting to sag a bit, losing that angular shape due to the moisture so prop it into shape and leave to dry.  Should only take about 24 hrs.

To add an extra layer of meaning to your mask print off copies of the actual archaeological maps of the Teotihuacan site. (check google images)

Paint these with the green and red tempera paint.  We will use these papers for our mosaic.

Let dry.

In the meantime paint your mask black.

Using posterboard, wc paper, or bristol tape in sections of paper on to the eye holes.


Paint in some eyes on the paper.  Lots of room here for different expressions.


Take your red and green paper and cut into strips and then into squares.

You don't want them to all be the same size.

Make sure to keep about 1/2 a page of the red paper in reserve.


Start gluing your mosaic into place.  you can follow the design of the original or come up with your own.


Take the reserved red paper and cut into long skinny triangles.  Apply a little glue on the back and roll onto a pencil or knitting needle starting with the wide end.

This will make some beads for the necklace.


When you have a few beads tape a string under the jaw of the mask on one side.

Line up your beads, (both your handmade ones as well as some pony beads and/or buttons).

String these onto your piece of string and then secure the end on the other side of the jaw.


Finally you can add a coat of Mod Podge if you wish.
MATERIALS REQUIRED: Paper Version

- black paper
- pencil and eraser
- red, green and white tempera paint
- copies of archaeological maps
- glue
- white pencil crayon
- white paper
- black sharpie, pencil crayon,

PROCEDURE:

Take a sheet of black paper and trace out your mask shape in pencil.

Using the white liquid tempera paint, paint in your eyes.


Start gluing on your mosaic design.


With paint, sharpie, or black pencil crayon color in your eyes.

When the mosaic is dry cut out mask.  You can add some detail with the white pencil crayon if you wish.

Glue to a contrasting background.


That's it.

Picasso Mask Study

This is an art study project that will take a few sessions to complete but is very rewarding.


There are 2 parts to it.  Constructing the mask and then after careful observation creating a painting influenced by the design elements of that mask.  With a class you can have students reference their own mask or that of their classmates.


Before starting spend some time discussing Cubism and the work of Picasso and Braque with your students.  This particular art project looks at the early stages of Cubism, (almost more expressionism).


With Cubism, we are experimenting with form, stylistic distortion of form, and we are looking at the viewer's perception of that form.

During this early work you can see how Picasso was influenced by his interest in Iberian Sculpture and African art. (see Demoioselles d' Avignon, 1907) 

MATERIALS REQUIRED:

- balloon
- paper towels
- white glue
- water and recycled container
- wax paper
- scissors
- paint, acrylic or tempera
- wc paper or heavy sketch paper 
- resource material (African mask images, Iberian sculpture)
- pencil

PROCEDURE:

Take your balloon and blow it up to the size of mask you want.

You can tape it to an old yogurt container if you want to assist in the drying process as well as making it easier to maneuver while constructing.

Cut up your paper towel into strips.  Mix up your white glue with some water (1 to 1 ratio) in an old recycled container.  Place some wax paper on your work space. Start constructing your mask.  Put some strips into your glue mixture and apply to your balloon. Cross the strips over one another.  You only need about 2 coats here.  We only need 1/2 the balloon covered to make a mask. Every once and a while add a dry strip to soak up extra moisture as well you can soak up all that excess glue mixture on the wax paper.  You want your mask to be moist not sopping.
You can add some details to the face by adding rolls of paper towel and applying eyebrows, a nose, as well as lips if you wish.


Leave upright to dry.  Here I placed the cup I had taped to my balloon into another old yogurt container.  You might have to put some weight into the container to keep that balloon upright.

Let dry.


When dry pop the balloon.  Take a pair of scissors and trim away the excess strips to get a nice edge around your mask.


Take your mask and paint it with either acrylic or tempera.  Try to incorporate design elements you saw in your reference material.
- African masks
- Iberian sculpture


Once the masks are completed you want to work on your painting. Tape down your wc paper or heavy sketch to your art board.

Using your own mask and/or ones by your classmates pick out specific design elements (lines, shapes, colors) and add these to your composition.  Draw it out in pencil first.  You're not looking to replicate the mask here only pull out elements that interest you and place them in a new arrangement.


Display your masks and paintings together.


Give it a try, it's very interesting to see what features or elements the kids focus on.


You might also like:

In the Style of Picasso: Portraits

METHOD 1

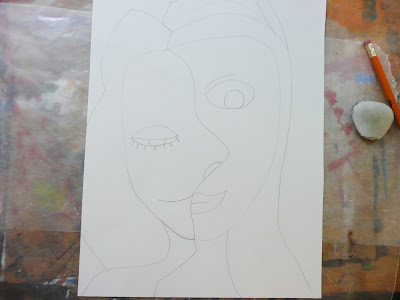
Picasso is always a hit with the kids.  I especially like doing self portraits in his style as it allows the students to be a bit more open without the inevitable "I don't know how to draw....or I'm just not good at this" type comments. (Seems to hit at Grade 4)

I have 2 methods to show you.

When describing the portrait I ask the students to see how he represents both the head on view and the side view together. I know that is a bit of a simplistic interpretation but all of a sudden I have kids really trying to interpret his paintings.....great to watch unfold.


MATERIALS REQUIRED:

- watercolor paper or heavy sketch/drawing paper
- pencil, eraser
- access to mirrors or use the partner method
- tempera disk paint
- sharpies or markers
- mounting paper

PROCEDURE:

To start get the students to draw an oval face with a neck and shoulders.  Head on view.

Now if they have access to mirrors (class set of Dollar Store hand mirrors works well), have them draw a line down the center of the oval,  (can be off kilter for a different look).
This will include the side view so they have to include some profile features like the nose in this line.


Now if you don't have access to mirrors a simple solution is to have the students working in pairs sketching their neighbor.
Now that the sketch is done it's time to paint.  You can use realistic color choices or to add some drama unusual colors.  (I usually go on here about how unusual colors signify dreams, visions, etc. in art)


Paint in all your sections.  In my sample I've kept the colors of the side view different from the heads on view...it's up to you.


Finally to give our portrait some "pop" I take my trusty sharpies and use black and silver to outline my portrait.


Mount onto a contrasting color and you're done.


My friend and colleague, Kim McCllough, recently did this lesson with her Grade 5s.  They used pastel instead of paint.


Terrific work everyone!


METHOD 2
The second portrait is a cut up face.


MATERIALS REQUIRED:

- colored paper, or white drawing paper
- paper for mounting
- pencil and eraser
- paint, markers, pastels or pencil crayon
- scissors
- glue

PROCEDURE:


Take your colored paper or plain white and sketch out a self portrait.  Use hand mirrors or the "sketch your neighbor" method.

You can do a head on or profile view.


Now add some color.  Here I'm using colored paper so I'm only adding lines with black, grey and white.  Incidentally I'm trying to keep to my value scale here. (good to do with older students)

Black lines are in shadow, white are highlights and grey middle value.


Now take those scissors and cut up your face.  You want pieces around 2 inches (5 cm) or so.  Try to keep some of the identifiable pieces intact, i.e. eyes, nose, mouth.


Take your mounting paper,arrange the cut up pieces and then glue into place.  Remind the students that this is not a puzzle, the pieces should be out of synch.


That's it.

A interesting study you could do with your students is to do both methods and then display both side by side.


For additional Picasso study be sure to check out my previous post on an "Mask Study".


See you soon.

Monday, 6 February 2012

piercings

 vertical industrial.industrial. double tragus. side corset. dermal punches. (i personally find these disgusting. but i'm still fascinated by them.) anti tragus.  anti brow. orbital. labret. (i like the spirally ring.) tongue piercing. (i adore this picture.) dimple. ^.^smiley.

Tuesday, 17 January 2012

belly piercing

 belly piercing belly piercing
 belly piercing belly piercing belly piercing belly piercing belly piercing belly piercingbelly piercing