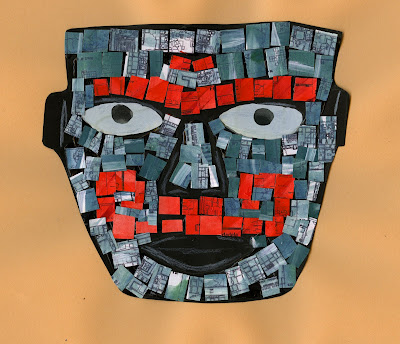
I find it artistically interesting because of the use of a mosaic on the mask, that's not something you see everyday.
Here is a picture of the original. This project was part of my "From Primitive to Post Modern" session. One of the advantages to this project is that because it is based on an ancient mask that is showing some decay or wear, the mosaic does not have to be fully finished.
Museo Preistorico ed Etnografico
Pigorini, Roma
 There is also a paper version I'll show you how to do at the end in case your are not up for papier mache.
 Before I start with the "how to" I have another featured Design post on the Hive right now that you might want to check out. the product I'm testing is Aleene's Paper Napkin Applique Glue and I show how to make this Star Wars book bag.
MATERIALS REQUIRED: Papier Mache Version
- a cardboard box
- mask stencil that you will make
- paper towels
- newspaper
- tape
- white school glue
- water and a recycled container
- black paint, tempera or acrylic
- red and green tempera paint
- copies of archaeological maps, #1, #2
- white paper, posterboard, or bristol
- string
- red beads
PROCEDURE:
Take a piece of paper (8.5 X 11) and fold in half.
Draw out 1/2 of the mask shape including an eye and mouth. Use the fold as the middle of the mask.
Cut out your stencil.
Take your cardboard box and tape your stencil on the side utilizing the corner to run down that middle line of your mask.
Trace out the shape and then cut from the box.
By using the corner you build in the angular shape to the mask.
Roll up a piece of newspaper and tape into place for the nose.
Using a 1 to 1 ratio mix up the white glue and water into your recycled container. Cut some strips from the paper towels and begin maching the mask.
Try to overlap the strips in a criss cross manner. You only need about 1 to 2 coats here.
Now you may find you cardboard starting to sag a bit, losing that angular shape due to the moisture so prop it into shape and leave to dry. Should only take about 24 hrs.
To add an extra layer of meaning to your mask print off copies of the actual archaeological maps of the Teotihuacan site. (check google images)
Paint these with the green and red tempera paint. We will use these papers for our mosaic.
Let dry.
In the meantime paint your mask black.
Using posterboard, wc paper, or bristol tape in sections of paper on to the eye holes.
Paint in some eyes on the paper. Lots of room here for different expressions.
Take your red and green paper and cut into strips and then into squares.
You don't want them to all be the same size.
Make sure to keep about 1/2 a page of the red paper in reserve.
Start gluing your mosaic into place. you can follow the design of the original or come up with your own.
Take the reserved red paper and cut into long skinny triangles. Apply a little glue on the back and roll onto a pencil or knitting needle starting with the wide end.
This will make some beads for the necklace.
When you have a few beads tape a string under the jaw of the mask on one side.
Line up your beads, (both your handmade ones as well as some pony beads and/or buttons).
String these onto your piece of string and then secure the end on the other side of the jaw.
Finally you can add a coat of Mod Podge if you wish.
- black paper
- pencil and eraser
- red, green and white tempera paint
- copies of archaeological maps
- glue
- white pencil crayon
- white paper
- black sharpie, pencil crayon,
PROCEDURE:
Take a sheet of black paper and trace out your mask shape in pencil.
Using the white liquid tempera paint, paint in your eyes.
Start gluing on your mosaic design.
With paint, sharpie, or black pencil crayon color in your eyes.
When the mosaic is dry cut out mask. You can add some detail with the white pencil crayon if you wish.
Glue to a contrasting background.
That's it.


No comments:
Post a Comment